Toilet flange installation is one of the most crucial aspects of a successful toilet replacement or new bathroom setup. Improper installation can lead to water leaks, unpleasant odours, or even structural floor damage. Whether you’re upgrading your bathroom fixtures or dealing with a broken flange, installing a toilet flange the right way is essential. In this detailed guide, we’ll cover everything you need to know about how to install a toilet flange in 8 steps, including best practices, common questions like whether the flange should sit flush with the floor, how far it should stick up, and more. Follow these expert tips from Delta Plumbers, Ontario’s most trusted plumbing specialists.
Picture Source – Delta Plumbers
What Is the Proper Way to Install a Toilet Flange?
Installing a toilet flange properly ensures a tight seal between the toilet and the drain pipe. A secure flange installation prevents sewer gas leaks and supports the toilet’s weight evenly.
Tools and Materials You’ll Need:
- Toilet flange (PVC or cast iron)
- Measuring tape
- Wax ring or rubber gasket seal
- PVC cement (if applicable)
- Toilet bolts and washers
- Power drill with masonry or wood bit
- Screwdriver
- Caulk or plumber’s putty
- Hacksaw (if cutting pipe is required)
- Flange extender (if needed)
Step-by-Step Overview:
- Remove the Old Toilet Flange
- Clean the Drain Pipe and the Surrounding Area
- Check the Drain Pipe Height
- Insert the New Flange into the Drain Pipe
- Anchor the Flange to the Floor
- Install the Toilet Bolts
- Place the Wax Ring or Gasket
- Install the Toilet
Let’s break down each step in detail.
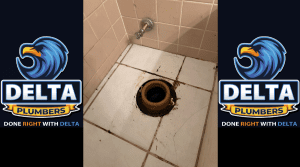
Step 1: Remove the Old Toilet Flange
Before installing a new flange, you must remove the existing one. Shut off the water supply and remove the toilet by unscrewing the nuts on the base and lifting it carefully. Set the toilet aside on a soft towel to avoid cracking the porcelain.
Using a screwdriver or pry bar, loosen and remove the screws anchoring the old flange. If the flange is glued or cemented into a PVC pipe, you may need to cut it out using a hacksaw or reciprocating saw. Be sure to wear gloves and protective eyewear during this process.
Pro Tip: Check for cracks or rot in the subfloor around the old flange. If the floor is damaged, it must be repaired before proceeding with the installation.
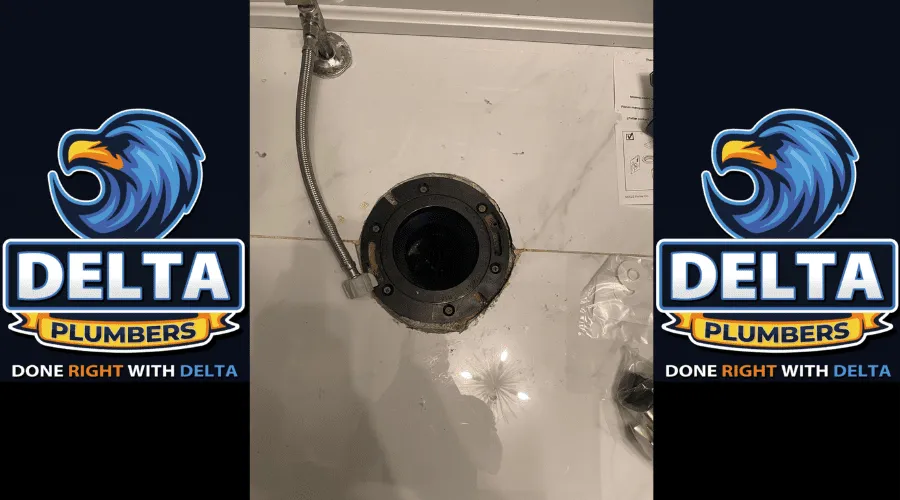
Step 2: Clean the Drain Pipe and the Surrounding Area
After removing the old flange, thoroughly clean the exposed drain pipe. Remove any wax residue, debris, or old caulk. A clean surface ensures a proper seal when the new flange is installed.
Use a rag soaked in warm, soapy water or a PVC pipe cleaner to remove any buildup inside the pipe mouth. Let it dry before proceeding.
Also Read: Top Signs You Need a Professional Drain Cleaning in Ontario
Picture Source – Delta Plumbers
Step 3: Check the Drain Pipe Height
One of the most common questions homeowners ask is:
Should a Toilet Flange Sit Flush with the Floor?
Answer: Yes. The top of the toilet flange should sit level with the finished floor surface (not subfloor). If the flange is too low, it won’t create a proper seal with the wax ring, potentially causing leaks. Also if it’s too high, the toilet may rock or sit unevenly.
If your finished flooring has recently been installed (like tile, vinyl, or hardwood), and the flange is now recessed, you’ll need to use a toilet flange extender to bring it to the correct height.
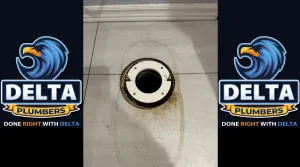
Step 4: Insert the New Flange into the Drain Pipe
Choose a toilet flange that matches your drain pipe diameter—usually 3” or 4” PVC. Slide the new flange into the drain pipe, ensuring it fits snugly. Most flanges come with a compression fit or are glued in place using PVC cement. Make sure the slots for the toilet bolts are aligned side to side (left to right) and not front to back.
If your flange is made of cast iron or ABS plastic, you’ll need specialized adhesives or a rubber gasket ring.
Also Read: Toilet Replacement Plumbing Service: Everything You Need to Know

Picture Source – Delta Plumbers
Do You Put the Wax Ring on the Toilet or the Flange?
Technically, either method works, but professionals usually place the wax ring on the bottom of the toilet bowl, not on the flange. This helps center the ring more easily and reduces the chance of displacement when setting the toilet.
Also Read: When to Repair vs Replace Your Water Heater

Picture Source – Delta Plumbers
Do You Screw Toilet Flange to Floor?
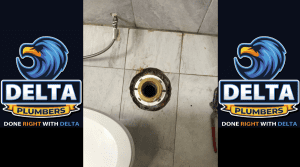
Step 5: Anchor the Flange to the Floor
Yes—always. Screwing the toilet flange securely to the floor is essential for preventing rocking or movement. Use appropriate screws for your subfloor type:
- For wood subfloors, use galvanized wood screws.
- For concrete floors, use masonry anchors and screws.
Tighten the screws evenly around the flange. Ensure the flange base is completely flush with the finished floor surface.
Also Read: Hidden Water Leaks: Signs, Risks, and What to Do

Picture Source – Delta Plumbers
Does a Toilet Flange Need to Be Anchored to the Floor?
Absolutely. Anchoring prevents lateral movement and supports the weight of the toilet and user. Failing to anchor it can lead to water leaks, damaged tiles, or even broken pipes.
Step 6: Install the Toilet Bolts
Slide the closet bolts (long bolts with flat heads) into the slots on the flange. Position them evenly on both sides of the flange (usually at the 9 and 3 o’clock positions). These bolts will secure the toilet to the flange later.
Use plastic or metal washers and nuts to temporarily hold them upright while you continue the installation.
Pro Tip: Use a flange bolt holder or masking tape to keep the bolts from falling over during the toilet placement.
Step 7: Place the Wax Ring or Gasket
As mentioned earlier, place a new wax ring or rubber toilet seal on the toilet outlet horn (the bottom discharge outlet of the toilet). Never reuse an old wax ring—it won’t reseal properly.
Press the wax ring gently around the horn, making sure it is centred. If you are using a no-wax gasket (like a rubber or foam seal), follow the manufacturer’s instructions for placement.
Step 8: Install the Toilet
Carefully lift the toilet and lower it over the flange, aligning the bolt holes on the toilet base with the flange bolts. Avoid rocking or twisting the toilet during placement, as this can damage the wax seal.
Once aligned, press the toilet firmly down until it rests evenly on the floor. Sit on the toilet to compress the wax ring further.
Secure the toilet by tightening the nuts on the flange bolts. Do not overtighten—this can crack the porcelain. Use a wrench and apply slow, even pressure.
Trim any excess bolt length with a hacksaw and snap on the decorative bolt covers.
Reconnect the water supply line, open the shut-off valve, and flush the toilet to test for leaks.
Also Read: How to Tell if You Need a Drain Pipe Replacement
Picture Source – Delta Plumbers
How to Properly Extend a Toilet Flange
If your existing flange is recessed due to new flooring, you can extend it using a toilet flange extender kit. These kits include plastic or rubber extenders and gaskets.
Steps to Extend a Toilet Flange:
- Clean the old flange.
- Apply silicone caulk around the top edge.
- Stack the extender rings until the height matches the new floor level.
- Screw the extenders in place using the provided hardware.
- Place the new wax ring on top before installing the toilet.
Flange extenders are crucial for ensuring the wax ring makes full contact, especially when dealing with tile or hardwood floors.
Also Read: Common DIY Plumbing Mistakes That Cost You More

Picture Source – Delta Plumbers
How Far Should a Toilet Flange Stick Above the Floor?
Ideally, the top edge of the toilet flange should sit exactly level with the finished floor. If it sticks up more than ¼ inch, the toilet may not sit flat. If it’s recessed more than ¼ inch, leaks are more likely.
In general:
- Flush to floor = Best
- Above ¼ inch = May require flange trimming
- Below floor = Use a flange extender
The right height ensures a proper wax ring seal and toilet stability.
Common Installation Mistakes to Avoid
- Reusing Old Wax Rings
Always install a new wax ring during any toilet or flange replacement.
- Not Anchoring the Flange
Failing to screw the flange into the floor leads to rocking toilets and broken seals.
- Using the Wrong Flange Height
Check the flange height after installing your final flooring. Avoid installing before tile, laminate, or vinyl.
- Misaligned Bolts
Improper bolt alignment makes it hard to lower the toilet straight, risking wax ring displacement.
- Overtightening the Bolts
Too much torque can crack the toilet base, leading to expensive repairs.
Toilet Flange Maintenance Tips
Even after a successful installation, regular inspection is wise:
- Check for rocking or wobbling.
- Inspect for water seepage around the toilet base.
- Tighten flange bolts annually.
- Replace the wax ring if you detect any odour or leaks.
Final Thoughts
Installing a toilet flange may seem intimidating, but with the right tools, a little patience, and this step-by-step guide, homeowners can achieve a leak-free, professional-grade installation. From ensuring the flange sits flush with the floor to securely anchoring it and applying a proper wax seal, each step is critical to long-term success.
Whether you’re dealing with a damaged flange or remodelling your bathroom floor, understanding how to install a toilet flange in 8 steps properly can save you money and hassle.
Still unsure or want a licensed professional to handle the job? Delta Plumbers is just a call away. We offer expert toilet flange repair and installation services across Ontario—done right the first time.
Proudly Serving Ontario’s Communities 🚰🛠️
Delta Plumbers delivers expert plumbing solutions across Ontario. From faucet repairs to full system overhauls, we’ve got you covered in:
We also serve areas like Windsor, Toronto, Kingston, Ottawa, Aurora, Kitchener, Fort Erie, Welland, Bowmanville, Whitby, and more.
